Blog Layout

Effective Ways To Identify Water Damage on Drywall

August 19, 2024

Water damage is one of the most common and costly issues homeowners face, particularly in areas like Barrie, Ontario, where weather conditions can be unpredictable. Water damage to drywall can lead to structural problems, mold growth, and unsightly stains if not addressed promptly. Recognizing the early signs of water damage on your drywall is crucial to preventing further complications. At Barrie Drywallers, we specialize in identifying and repairing water-damaged drywall, helping you maintain a safe and healthy home. Here's how you can effectively identify water damage on drywall.


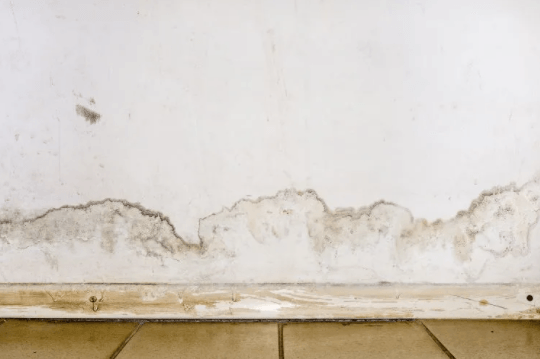
1. Discoloration and Stains

One of the most noticeable signs of water damage on drywall is discoloration. Water stains often appear as yellow, brown, or dark spots on the surface of the drywall. These stains are typically irregular in shape and may spread over time if the underlying issue isn't addressed.


What to Look For:

  • Yellow or Brown Spots: These are usually the first visible sign of water damage and indicate that water has seeped into the drywall.
  • Dark Patches: If the water damage is severe, the affected area may turn a darker color, often accompanied by a damp feeling.


Action to Take:

  • Inspect your walls regularly, especially in areas prone to moisture, such as basements, bathrooms, and around windows.
  • If you notice discoloration, it's essential to investigate the source of the moisture immediately to prevent further damage.


2. Soft or Spongy Texture

Drywall is typically firm and solid to the touch. However, when it becomes water-damaged, it can lose its integrity, becoming soft or spongy. This texture change occurs because the drywall absorbs water, causing it to swell and weaken.


What to Look For:

  • Soft Spots: Press gently on areas of the wall where you suspect water damage. If the drywall feels soft, spongy, or crumbles under light pressure, it is likely damaged.
  • Bubbling or Warping: Sometimes, water-damaged drywall will begin to bubble or warp, creating a noticeable difference in texture and appearance.


Action to Take:

  • If you detect soft spots or warping, it's crucial to address the issue promptly to prevent further deterioration.
  • Consider contacting a professional to assess the extent of the damage and recommend appropriate repairs.


3. Peeling Paint or Wallpaper

Water-damaged drywall often causes the paint or wallpaper covering it to peel, bubble, or crack. This happens because the moisture underneath the surface prevents the paint or wallpaper from adhering properly to the drywall.


What to Look For:

  • Peeling or Bubbling Paint: If the paint on your walls begins to peel or bubble, especially in patches, it may be a sign of water damage.
  • Wallpaper Detachment: Similarly, if wallpaper starts to come loose or shows signs of bubbling, this could indicate moisture beneath the surface.


Action to Take:

  • Inspect any areas where paint or wallpaper is peeling or bubbling, particularly in rooms with high humidity levels.
  • Remove a small section of the peeling material to check the condition of the drywall underneath. If it’s damp or discolored, water damage is likely the cause.


4. Mold Growth

Mold is a serious concern when it comes to water-damaged drywall. Mold spores thrive in moist environments and can spread rapidly, posing health risks to you and your family. Early detection of mold growth is critical to preventing widespread contamination.


What to Look For:

  • Black or Green Patches: Mold typically appears as black, green, or white patches on the surface of the drywall.
  • Musty Odor: Even if mold isn't visible, a musty or earthy smell can be an indicator of mold growth behind the walls.


Action to Take:

  • If you detect mold, it's vital to take immediate action to prevent it from spreading. Mold can cause respiratory issues and other health problems, so it's best to consult with a professional for safe removal.
  • Address the source of moisture to prevent mold from returning after remediation.


5. Cracking or Sagging Drywall

Cracks in drywall are often a sign of structural issues, but when combined with moisture, they can indicate water damage. Sagging drywall, on the other hand, is a more severe sign of water infiltration and usually means the drywall has absorbed a significant amount of water.


What to Look For:

  • Cracks: Look for small or large cracks in the drywall, particularly near the ceiling or corners. If these cracks are accompanied by discoloration or dampness, water damage is likely.
  • Sagging: Sagging drywall is a clear indication of severe water damage. It may appear as a bulge or dip in the wall or ceiling, often accompanied by a soft texture.


Action to Take:

  • Cracks can often be repaired if caught early, but if water damage is the cause, the underlying issue must be addressed first.
  • Sagging drywall is a serious problem that requires immediate attention. It may be necessary to replace the affected drywall to restore the integrity of the wall or ceiling.


6. Addressing Water Damage Early

Early detection of water damage on drywall is crucial to preventing costly repairs and maintaining a safe living environment. If you notice any of the signs mentioned above, it's essential to act quickly to address the issue.


Steps to Take:

  • Identify the Source: Determine where the water is coming from—whether it's a leaky pipe, roof, or window—and fix the problem at its source.
  • Dry the Area: Use fans, dehumidifiers, and ventilation to dry out the affected area as quickly as possible to prevent further damage and mold growth.
  • Repair or Replace: Depending on the severity of the damage, you may need to repair small sections of drywall or replace entire panels. It's often best to consult a professional to ensure the job is done correctly.


At Barrie Drywallers, we specialize in identifying and repairing water damage to drywall. Our team of experts can assess the extent of the damage, recommend the best course of action, and restore your walls to their original condition. Don't wait until the damage worsens—contact us today for a consultation.


Water damage can be a significant concern for homeowners, but with the right knowledge and prompt action, you can protect your home and your health. By keeping an eye out for these signs and addressing water damage early, you can ensure the longevity and safety of your drywall and overall home structure.

You Might Also Enjoy:

December 3, 2024
Installing drywall is a key step in transforming any space, whether it’s a new construction project or a home renovation. However, the success of drywall installation largely depends on how well the walls are prepared beforehand. At Barrie Drywallers , we know that proper preparation is the foundation of a smooth and efficient installation process. Here's a step-by-step guide to getting your walls ready for drywall installation . 1. Clear the Area Before you begin, ensure that the workspace is clean and clutter-free. Move furniture, cover floors with drop cloths, and remove any obstacles that might hinder the installation process. Why This Matters: A clean and open workspace minimizes the risk of damage and allows installers to work efficiently. 2. Inspect the Walls Carefully examine the walls for any issues that could affect the drywall installation, such as cracks, water damage, or uneven surfaces. What to Look For: Cracks or Holes: Repair these to provide a stable surface. Moisture or Mold: Address these issues immediately to prevent future damage. 3. Address Insulation Needs If your walls lack proper insulation, now is the time to install or upgrade it. Adequate insulation not only improves energy efficiency but also enhances soundproofing. Pro Tip: In areas prone to moisture, like basements, consider using moisture-resistant insulation materials. 4. Ensure Proper Framing Check that the wall studs are properly spaced and securely installed. The standard spacing for studs is 16 or 24 inches apart. Ensure they are level and aligned to avoid uneven drywall. Tools You’ll Need: Level: To check for straightness. Measuring Tape: To confirm correct spacing. 5. Install Vapor Barriers In areas like basements or bathrooms, adding a vapor barrier is crucial to prevent moisture from seeping into the walls. Material Options: Plastic Sheets: Cost-effective and easy to install. Specialized Paints: Ideal for areas requiring a seamless application. 6. Pre-Plan Electrical and Plumbing If your project involves electrical wiring or plumbing, make sure all these elements are installed and secured before drywall installation. Mark their locations clearly on the studs to avoid accidentally covering access points. What to Check: Ensure electrical boxes are flush with the intended drywall surface. Verify that plumbing pipes are securely anchored. 7. Clean and Prime the Surface Dust and debris on the walls can interfere with drywall adhesion. Use a broom, vacuum, or cloth to thoroughly clean the wall surface. Optional Step: Apply a primer to improve the adherence of joint compounds and paint after the drywall is installed. 8. Gather the Right Tools Having the necessary tools and materials on hand ensures a smooth installation process. Checklist: Drywall sheets Screws or nails Drywall tape and joint compound Utility knife and drywall saw Screw gun or drill Why Choose Barrie Drywallers? At Barrie Drywallers , we understand that a flawless drywall installation begins with meticulous preparation. Here’s why our clients in Barrie, Ontario, trust us: Expertise: Our experienced team knows the ins and outs of drywall preparation and installation. Quality Materials: We use only top-tier materials for durable, long-lasting results. Attention to Detail: We ensure every step is done right, from framing to finishing. Local Knowledge: As a trusted local company, we understand the unique needs of Barrie homes and businesses. Conclusion Proper wall preparation is the secret to a seamless drywall installation. By following these steps, you’ll create a sturdy foundation for your new walls, ensuring they look great and perform well for years to come. If you’re planning a drywall project and need expert assistance, Barrie Drywallers is here to help. Contact us today for professional, reliable drywall services tailored to your needs!
November 27, 2024
When it comes to drywall, the materials you choose can significantly impact your home's durability, appearance, and functionality. For homeowners and contractors in Barrie, Ontario, who prioritize quality and longevity, solid gypsum sheets stand out as a superior choice. At Barrie Drywallers , we believe in using only the best materials to provide flawless results that last for years. What Are Solid Gypsum Sheets? Solid gypsum sheets are drywall panels made primarily of gypsum, a natural mineral prized for its strength, fire resistance, and versatility. These sheets are sandwiched between layers of durable paper or fiberglass, resulting in a sturdy and reliable construction material suitable for various applications. Key Benefits of Solid Gypsum Sheets 1. Exceptional Durability Gypsum is naturally resilient, making solid gypsum sheets resistant to cracking and wear. This durability ensures that your walls and ceilings can withstand daily stresses, whether in a high-traffic residential area or a busy commercial space. 2. Superior Fire Resistance Safety is paramount, and solid gypsum sheets excel in fire resistance. Gypsum contains water in its mineral structure, which is released as steam when exposed to heat, slowing the spread of flames. Many solid gypsum sheets are fire-rated, making them an ideal choice for homes and businesses prioritizing safety. 3. Enhanced Soundproofing For those looking to create quiet, peaceful spaces, gypsum sheets are an excellent option. Their dense composition helps reduce noise transmission between rooms, making them perfect for offices, bedrooms, or entertainment areas. 4. Moisture and Mold Resistance In a climate like Barrie’s, where humidity levels can vary, moisture-resistant gypsum sheets are invaluable. These sheets are treated to resist water absorption, reducing the risk of mold and mildew growth in areas like bathrooms, basements, and kitchens. 5. Smooth and Versatile Finishing Solid gypsum sheets provide a smooth, even surface, perfect for painting, texturing, or wallpapering. Their versatility ensures a professional finish for any design style. Applications of Solid Gypsum Sheets Solid gypsum sheets are versatile and can be used in: Residential projects: Ideal for walls and ceilings in living rooms, bedrooms, and kitchens. Commercial spaces: Perfect for offices, retail stores, and restaurants needing durability and fire safety. Specialty areas: Moisture-resistant sheets are excellent for bathrooms and basements, while soundproofing options enhance theaters and recording studios. Why Choose Solid Gypsum Sheets Over Other Drywall Options? While there are various drywall options available, solid gypsum sheets stand out due to their: Longevity: Fewer repairs and replacements over time. Safety: Increased fire and mold resistance. Eco-Friendliness: Many gypsum sheets are recyclable and made with sustainable materials. Cost-Effectiveness: While slightly more expensive initially, their durability saves money in the long run. Tips for Installing Solid Gypsum Sheets Proper installation is crucial to maximizing the benefits of solid gypsum sheets. Here’s how Barrie Drywallers ensures a flawless finish: Accurate Measurements: Precise cutting minimizes gaps and ensures a seamless fit. Secure Fastening: Using the right screws and techniques to prevent sagging or movement. Expert Taping and Mudding: Achieving a smooth surface free of visible seams or imperfections. Finishing Touches: Applying primer and paint for a polished and professional look. Why Barrie Drywallers Is Your Go-To Choice At Barrie Drywallers, we specialize in using top-tier materials like solid gypsum sheets to deliver exceptional results. Our experienced team ensures that every project, whether residential or commercial , meets the highest standards of quality and durability. Conclusion Solid gypsum sheets are the ultimate choice for superior drywall, offering durability, safety, and versatility. Whether you’re renovating a home or building a new commercial space in Barrie, Ontario, investing in high-quality drywall materials will pay off in the long run. Ready to upgrade your walls with solid gypsum sheets? Contact Barrie Drywallers today for expert advice, professional installation, and unparalleled craftsmanship.
November 18, 2024
Drywall finishing is an essential step in any renovation or construction project. Whether you’re remodeling a single room or building a new home, achieving a smooth and polished look with drywall finishing can make all the difference in the final appearance of your space. At Barrie Drywallers , we understand that a high-quality drywall finish not only enhances the aesthetics of your property but also adds value and durability. In this article, we’ll walk you through the process of drywall finishing , breaking down each step to help you achieve professional results. What is Drywall Finishing? Drywall finishing involves applying joint compound (often called "mud") to the seams, joints, and screw holes of drywall sheets to create a smooth, seamless surface. The goal is to make the walls or ceilings ready for painting, texturing, or wallpapering. This process includes several stages, from applying the initial coat of compound to sanding and priming for a flawless finish. Why is Drywall Finishing Important? Aesthetic Appeal : A well-finished wall enhances the overall look of your home or office. Durability : Proper finishing helps protect the drywall from damage and wear over time. Value Addition : High-quality drywall finishing can increase the resale value of your property. The 5 Levels of Drywall Finishing Before diving into the step-by-step process, it’s helpful to understand the different levels of drywall finishing. The levels range from 0 to 5 , each representing a different degree of smoothness and readiness for paint: Level 0 : No finishing. Drywall is simply hung without any mud or tape. Level 1 : A single coat of joint compound over the tape. Often used in hidden areas like attics. Level 2 : Two coats of compound. Suitable for garages and utility spaces. Level 3 : Three coats of compound. Used for surfaces that will receive a heavy texture. Level 4 : Three coats, plus a light sanding. Ideal for walls that will be painted with a flat or satin finish. Level 5 : The highest level, with a skim coat applied for a perfectly smooth surface, ready for high-gloss paint or critical lighting. For most residential spaces, Level 4 is standard, but Level 5 is recommended for high-end finishes and areas with strong natural or artificial light. Step-by-Step Guide to Drywall Finishing Step 1: Preparation and Inspection Before you start, inspect the drywall installation to ensure all screws are properly set and the panels are securely attached. Remove any dust, debris, or protruding screws that could interfere with the finishing process. Tools Needed : Screwdriver, utility knife, sanding block. Tip : Use a shop vac to clean up dust from drywall surfaces for better compound adhesion. Step 2: Applying Drywall Tape Start by applying a layer of joint compound along the seams between drywall panels. Then, press paper or mesh tape into the wet compound to reinforce the joints. Paper Tape : Provides a stronger hold and prevents cracks. Mesh Tape : Easier to work with, especially for beginners, but may require more compound. Smooth out the tape using a 6-inch drywall knife , removing any excess compound to create a flat surface. Step 3: First Coat of Joint Compound (Mudding) Once the tape is in place, apply the first coat of joint compound over all seams, corners, and screw holes. Use a 10- to 12-inch drywall knife to feather the edges, ensuring a smooth transition between the compound and the drywall surface. Tip : Apply the compound in thin layers to avoid cracking and reduce drying time. Drying Time : Allow 24 hours for the compound to dry completely before moving to the next step. Step 4: Second Coat of Joint Compound After the first coat is completely dry, lightly sand the surface with a sanding sponge or fine-grit sandpaper to remove any ridges or bumps. Wipe away dust with a damp cloth. Apply a second coat of compound, extending it a few inches beyond the edges of the first coat to create a wider, more seamless blend. Use a larger drywall knife for this step to achieve a smoother finish. Step 5: Third Coat of Joint Compound The third coat, also known as the final coat , is applied to perfect the surface. This coat should be even thinner than the previous ones, focusing on filling in any remaining imperfections. Tip : Feather the edges as much as possible to avoid visible lines after painting. Drying Time : Again, let it dry for 24 hours before sanding. Step 6: Sanding the Surface Once the final coat is dry, it’s time to sand the entire surface to achieve a smooth finish. Use a sanding pole or a sanding block with fine-grit sandpaper for best results. Tip : Use a light source to check for imperfections. Hold a work light at an angle against the wall to highlight any uneven areas. Safety : Wear a dust mask and safety goggles to protect yourself from drywall dust. Step 7: Applying a Primer The last step in drywall finishing is applying a drywall primer to seal the surface and prepare it for paint. Priming helps paint adhere better and provides a uniform appearance. Tools Needed : Roller, paintbrush, primer. Tip : Use a high-quality primer to prevent flashing (uneven sheen) in the final paint job. Common Drywall Finishing Mistakes to Avoid Skipping the Primer : Not priming the walls can result in uneven paint coverage. Rushing the Drying Time : Applying additional coats before the previous one is fully dry can lead to cracks and bubbles. Using the Wrong Tape : Paper tape is best for flat seams, while mesh tape is better for patching small holes. Why Choose Barrie Drywallers for Your Drywall Finishing Needs? At Barrie Drywallers , we take pride in delivering high-quality drywall finishing services for both residential and commercial projects. Here’s why homeowners and businesses in Barrie, Ontario, trust us: Experienced Professionals : Our skilled team has years of experience in drywall finishing, ensuring a flawless result every time. Quality Materials : We use only the best compounds, tapes, and primers for a durable finish. Customer Satisfaction : We’re committed to providing exceptional service and exceeding customer expectations. Final Thoughts Drywall finishing is a critical step that can make or break the look of your interiors. By following the right process and using the correct tools, you can achieve a smooth, professional finish that enhances the beauty and value of your property. Whether you're tackling a DIY project or looking for expert help, Barrie Drywallers is here to assist you with all your drywall needs. Ready to transform your space? Contact Barrie Drywallers today for a free consultation and estimate on your next drywall finishing project!
More Posts

Contact Us!

Home

Share by: