Blog Layout

The Importance of Timely Water Damage Restoration

June 19, 2024

Water damage can be a homeowner's worst nightmare, leading to extensive and costly repairs if not addressed promptly. At Barrie Drywallers, we understand the impact water damage can have on your home, particularly on your drywall. In this article, we'll explore the common causes of water damage and highlight why it's crucial to address it without delay.


Common Causes of Water Damage

Water damage can occur for various reasons, each requiring a different approach to repair. Here are some of the most common causes:

1. Leaking Pipes

One of the most frequent culprits of water damage is leaking pipes. Whether it's due to aging, corrosion, or improper installation, even a small leak can lead to significant damage over time. It's essential to regularly inspect your plumbing system and address any issues immediately.
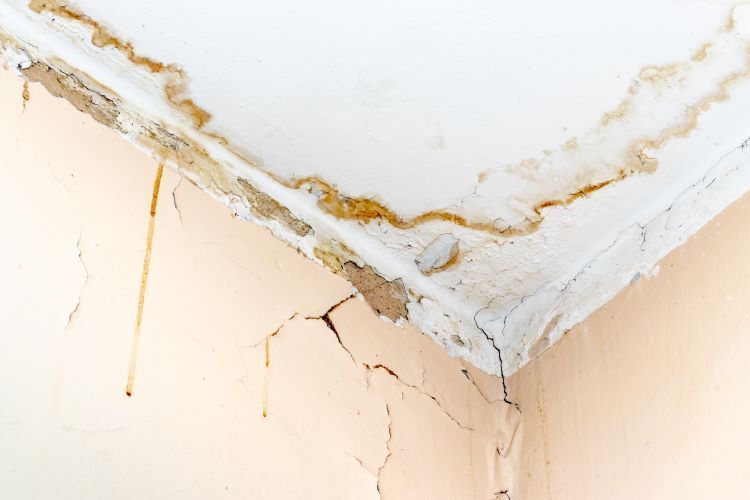
2. Roof Leaks

A damaged or aging roof can allow water to seep into your home, affecting your ceilings and walls. Regular roof maintenance and prompt repairs are critical in preventing water damage from roof leaks.

3. Flooding

Natural disasters like heavy rainfall, storms, or overflowing rivers can cause flooding. This can result in extensive water damage to your home's foundation, walls, and flooring. Preparing for such events and having a response plan can mitigate the impact.

4. Poor Drainage Systems

Improper drainage systems around your home can lead to water accumulation, which can seep into your basement or lower levels. Ensuring your gutters, downspouts, and landscaping direct water away from your home is crucial.

5. Appliance Malfunctions

Appliances like washing machines, dishwashers, and water heaters can malfunction, leading to water leaks. Regular maintenance and timely repairs of these appliances can prevent unexpected water damage.


The Significance of Addressing Water Damage Promptly

Ignoring or delaying the repair of water damage can have severe consequences for your home and health. Here's why addressing it promptly is so important:


1. Preventing Structural Damage

Water can weaken the structural integrity of your home. Over time, it can cause wood to rot, metal to corrode, and drywall to deteriorate. Prompt repairs can prevent these issues from escalating and maintain the safety of your home.


2. Mold and Mildew Growth

Water damage creates the perfect environment for mold and mildew to thrive. These fungi can spread rapidly, causing not only structural damage but also serious health problems, including respiratory issues and allergies. Quick action can stop mold growth before it becomes a significant issue.


3. Maintaining Indoor Air Quality

Water damage can compromise the air quality in your home. Mold spores and mildew can circulate through your HVAC system, affecting the air you breathe. Addressing water damage promptly helps maintain a healthy indoor environment.


4. Cost Savings

The longer water damage is left unaddressed, the more extensive and costly the repairs become. Prompt action can save you money in the long run by preventing further damage and reducing the need for major repairs or replacements.


5. Preserving Property Value

Water damage can significantly decrease the value of your property. Potential buyers are likely to be deterred by signs of water damage, mold, or structural issues. Repairing water damage promptly helps preserve your property's value and marketability.


How Barrie Drywallers Can Help

At Barrie Drywallers, we specialize in water damage repair and restoration. Our team of experienced professionals is equipped to handle all aspects of water damage repair, from assessing the extent of the damage to performing necessary repairs and restoration.

Our Services Include:

  • Assessment and Inspection: Thoroughly inspecting your property to identify the source and extent of the water damage.
  • Drywall Repair and Replacement: Repairing or replacing damaged drywall to restore your walls and ceilings to their original condition.
  • Mold Remediation: Safely and effectively removing mold and preventing its recurrence.
  • Preventative Measures: Advising on steps to prevent future water damage, such as improving drainage and addressing plumbing issues.


Water damage can have devastating effects on your home if not addressed promptly. Understanding the common causes and the importance of immediate action can help you protect your property and health.


At Barrie Drywallers, we are committed to providing expert water damage repair services to the residents of Barrie, Ontario. Contact us today to learn more about our services and how we can help you restore your home after water damage.

You Might Also Enjoy:

December 3, 2024
Installing drywall is a key step in transforming any space, whether it’s a new construction project or a home renovation. However, the success of drywall installation largely depends on how well the walls are prepared beforehand. At Barrie Drywallers , we know that proper preparation is the foundation of a smooth and efficient installation process. Here's a step-by-step guide to getting your walls ready for drywall installation . 1. Clear the Area Before you begin, ensure that the workspace is clean and clutter-free. Move furniture, cover floors with drop cloths, and remove any obstacles that might hinder the installation process. Why This Matters: A clean and open workspace minimizes the risk of damage and allows installers to work efficiently. 2. Inspect the Walls Carefully examine the walls for any issues that could affect the drywall installation, such as cracks, water damage, or uneven surfaces. What to Look For: Cracks or Holes: Repair these to provide a stable surface. Moisture or Mold: Address these issues immediately to prevent future damage. 3. Address Insulation Needs If your walls lack proper insulation, now is the time to install or upgrade it. Adequate insulation not only improves energy efficiency but also enhances soundproofing. Pro Tip: In areas prone to moisture, like basements, consider using moisture-resistant insulation materials. 4. Ensure Proper Framing Check that the wall studs are properly spaced and securely installed. The standard spacing for studs is 16 or 24 inches apart. Ensure they are level and aligned to avoid uneven drywall. Tools You’ll Need: Level: To check for straightness. Measuring Tape: To confirm correct spacing. 5. Install Vapor Barriers In areas like basements or bathrooms, adding a vapor barrier is crucial to prevent moisture from seeping into the walls. Material Options: Plastic Sheets: Cost-effective and easy to install. Specialized Paints: Ideal for areas requiring a seamless application. 6. Pre-Plan Electrical and Plumbing If your project involves electrical wiring or plumbing, make sure all these elements are installed and secured before drywall installation. Mark their locations clearly on the studs to avoid accidentally covering access points. What to Check: Ensure electrical boxes are flush with the intended drywall surface. Verify that plumbing pipes are securely anchored. 7. Clean and Prime the Surface Dust and debris on the walls can interfere with drywall adhesion. Use a broom, vacuum, or cloth to thoroughly clean the wall surface. Optional Step: Apply a primer to improve the adherence of joint compounds and paint after the drywall is installed. 8. Gather the Right Tools Having the necessary tools and materials on hand ensures a smooth installation process. Checklist: Drywall sheets Screws or nails Drywall tape and joint compound Utility knife and drywall saw Screw gun or drill Why Choose Barrie Drywallers? At Barrie Drywallers , we understand that a flawless drywall installation begins with meticulous preparation. Here’s why our clients in Barrie, Ontario, trust us: Expertise: Our experienced team knows the ins and outs of drywall preparation and installation. Quality Materials: We use only top-tier materials for durable, long-lasting results. Attention to Detail: We ensure every step is done right, from framing to finishing. Local Knowledge: As a trusted local company, we understand the unique needs of Barrie homes and businesses. Conclusion Proper wall preparation is the secret to a seamless drywall installation. By following these steps, you’ll create a sturdy foundation for your new walls, ensuring they look great and perform well for years to come. If you’re planning a drywall project and need expert assistance, Barrie Drywallers is here to help. Contact us today for professional, reliable drywall services tailored to your needs!
November 27, 2024
When it comes to drywall, the materials you choose can significantly impact your home's durability, appearance, and functionality. For homeowners and contractors in Barrie, Ontario, who prioritize quality and longevity, solid gypsum sheets stand out as a superior choice. At Barrie Drywallers , we believe in using only the best materials to provide flawless results that last for years. What Are Solid Gypsum Sheets? Solid gypsum sheets are drywall panels made primarily of gypsum, a natural mineral prized for its strength, fire resistance, and versatility. These sheets are sandwiched between layers of durable paper or fiberglass, resulting in a sturdy and reliable construction material suitable for various applications. Key Benefits of Solid Gypsum Sheets 1. Exceptional Durability Gypsum is naturally resilient, making solid gypsum sheets resistant to cracking and wear. This durability ensures that your walls and ceilings can withstand daily stresses, whether in a high-traffic residential area or a busy commercial space. 2. Superior Fire Resistance Safety is paramount, and solid gypsum sheets excel in fire resistance. Gypsum contains water in its mineral structure, which is released as steam when exposed to heat, slowing the spread of flames. Many solid gypsum sheets are fire-rated, making them an ideal choice for homes and businesses prioritizing safety. 3. Enhanced Soundproofing For those looking to create quiet, peaceful spaces, gypsum sheets are an excellent option. Their dense composition helps reduce noise transmission between rooms, making them perfect for offices, bedrooms, or entertainment areas. 4. Moisture and Mold Resistance In a climate like Barrie’s, where humidity levels can vary, moisture-resistant gypsum sheets are invaluable. These sheets are treated to resist water absorption, reducing the risk of mold and mildew growth in areas like bathrooms, basements, and kitchens. 5. Smooth and Versatile Finishing Solid gypsum sheets provide a smooth, even surface, perfect for painting, texturing, or wallpapering. Their versatility ensures a professional finish for any design style. Applications of Solid Gypsum Sheets Solid gypsum sheets are versatile and can be used in: Residential projects: Ideal for walls and ceilings in living rooms, bedrooms, and kitchens. Commercial spaces: Perfect for offices, retail stores, and restaurants needing durability and fire safety. Specialty areas: Moisture-resistant sheets are excellent for bathrooms and basements, while soundproofing options enhance theaters and recording studios. Why Choose Solid Gypsum Sheets Over Other Drywall Options? While there are various drywall options available, solid gypsum sheets stand out due to their: Longevity: Fewer repairs and replacements over time. Safety: Increased fire and mold resistance. Eco-Friendliness: Many gypsum sheets are recyclable and made with sustainable materials. Cost-Effectiveness: While slightly more expensive initially, their durability saves money in the long run. Tips for Installing Solid Gypsum Sheets Proper installation is crucial to maximizing the benefits of solid gypsum sheets. Here’s how Barrie Drywallers ensures a flawless finish: Accurate Measurements: Precise cutting minimizes gaps and ensures a seamless fit. Secure Fastening: Using the right screws and techniques to prevent sagging or movement. Expert Taping and Mudding: Achieving a smooth surface free of visible seams or imperfections. Finishing Touches: Applying primer and paint for a polished and professional look. Why Barrie Drywallers Is Your Go-To Choice At Barrie Drywallers, we specialize in using top-tier materials like solid gypsum sheets to deliver exceptional results. Our experienced team ensures that every project, whether residential or commercial , meets the highest standards of quality and durability. Conclusion Solid gypsum sheets are the ultimate choice for superior drywall, offering durability, safety, and versatility. Whether you’re renovating a home or building a new commercial space in Barrie, Ontario, investing in high-quality drywall materials will pay off in the long run. Ready to upgrade your walls with solid gypsum sheets? Contact Barrie Drywallers today for expert advice, professional installation, and unparalleled craftsmanship.
November 18, 2024
Drywall finishing is an essential step in any renovation or construction project. Whether you’re remodeling a single room or building a new home, achieving a smooth and polished look with drywall finishing can make all the difference in the final appearance of your space. At Barrie Drywallers , we understand that a high-quality drywall finish not only enhances the aesthetics of your property but also adds value and durability. In this article, we’ll walk you through the process of drywall finishing , breaking down each step to help you achieve professional results. What is Drywall Finishing? Drywall finishing involves applying joint compound (often called "mud") to the seams, joints, and screw holes of drywall sheets to create a smooth, seamless surface. The goal is to make the walls or ceilings ready for painting, texturing, or wallpapering. This process includes several stages, from applying the initial coat of compound to sanding and priming for a flawless finish. Why is Drywall Finishing Important? Aesthetic Appeal : A well-finished wall enhances the overall look of your home or office. Durability : Proper finishing helps protect the drywall from damage and wear over time. Value Addition : High-quality drywall finishing can increase the resale value of your property. The 5 Levels of Drywall Finishing Before diving into the step-by-step process, it’s helpful to understand the different levels of drywall finishing. The levels range from 0 to 5 , each representing a different degree of smoothness and readiness for paint: Level 0 : No finishing. Drywall is simply hung without any mud or tape. Level 1 : A single coat of joint compound over the tape. Often used in hidden areas like attics. Level 2 : Two coats of compound. Suitable for garages and utility spaces. Level 3 : Three coats of compound. Used for surfaces that will receive a heavy texture. Level 4 : Three coats, plus a light sanding. Ideal for walls that will be painted with a flat or satin finish. Level 5 : The highest level, with a skim coat applied for a perfectly smooth surface, ready for high-gloss paint or critical lighting. For most residential spaces, Level 4 is standard, but Level 5 is recommended for high-end finishes and areas with strong natural or artificial light. Step-by-Step Guide to Drywall Finishing Step 1: Preparation and Inspection Before you start, inspect the drywall installation to ensure all screws are properly set and the panels are securely attached. Remove any dust, debris, or protruding screws that could interfere with the finishing process. Tools Needed : Screwdriver, utility knife, sanding block. Tip : Use a shop vac to clean up dust from drywall surfaces for better compound adhesion. Step 2: Applying Drywall Tape Start by applying a layer of joint compound along the seams between drywall panels. Then, press paper or mesh tape into the wet compound to reinforce the joints. Paper Tape : Provides a stronger hold and prevents cracks. Mesh Tape : Easier to work with, especially for beginners, but may require more compound. Smooth out the tape using a 6-inch drywall knife , removing any excess compound to create a flat surface. Step 3: First Coat of Joint Compound (Mudding) Once the tape is in place, apply the first coat of joint compound over all seams, corners, and screw holes. Use a 10- to 12-inch drywall knife to feather the edges, ensuring a smooth transition between the compound and the drywall surface. Tip : Apply the compound in thin layers to avoid cracking and reduce drying time. Drying Time : Allow 24 hours for the compound to dry completely before moving to the next step. Step 4: Second Coat of Joint Compound After the first coat is completely dry, lightly sand the surface with a sanding sponge or fine-grit sandpaper to remove any ridges or bumps. Wipe away dust with a damp cloth. Apply a second coat of compound, extending it a few inches beyond the edges of the first coat to create a wider, more seamless blend. Use a larger drywall knife for this step to achieve a smoother finish. Step 5: Third Coat of Joint Compound The third coat, also known as the final coat , is applied to perfect the surface. This coat should be even thinner than the previous ones, focusing on filling in any remaining imperfections. Tip : Feather the edges as much as possible to avoid visible lines after painting. Drying Time : Again, let it dry for 24 hours before sanding. Step 6: Sanding the Surface Once the final coat is dry, it’s time to sand the entire surface to achieve a smooth finish. Use a sanding pole or a sanding block with fine-grit sandpaper for best results. Tip : Use a light source to check for imperfections. Hold a work light at an angle against the wall to highlight any uneven areas. Safety : Wear a dust mask and safety goggles to protect yourself from drywall dust. Step 7: Applying a Primer The last step in drywall finishing is applying a drywall primer to seal the surface and prepare it for paint. Priming helps paint adhere better and provides a uniform appearance. Tools Needed : Roller, paintbrush, primer. Tip : Use a high-quality primer to prevent flashing (uneven sheen) in the final paint job. Common Drywall Finishing Mistakes to Avoid Skipping the Primer : Not priming the walls can result in uneven paint coverage. Rushing the Drying Time : Applying additional coats before the previous one is fully dry can lead to cracks and bubbles. Using the Wrong Tape : Paper tape is best for flat seams, while mesh tape is better for patching small holes. Why Choose Barrie Drywallers for Your Drywall Finishing Needs? At Barrie Drywallers , we take pride in delivering high-quality drywall finishing services for both residential and commercial projects. Here’s why homeowners and businesses in Barrie, Ontario, trust us: Experienced Professionals : Our skilled team has years of experience in drywall finishing, ensuring a flawless result every time. Quality Materials : We use only the best compounds, tapes, and primers for a durable finish. Customer Satisfaction : We’re committed to providing exceptional service and exceeding customer expectations. Final Thoughts Drywall finishing is a critical step that can make or break the look of your interiors. By following the right process and using the correct tools, you can achieve a smooth, professional finish that enhances the beauty and value of your property. Whether you're tackling a DIY project or looking for expert help, Barrie Drywallers is here to assist you with all your drywall needs. Ready to transform your space? Contact Barrie Drywallers today for a free consultation and estimate on your next drywall finishing project!
More Posts

Contact Us!

Home

Share by: